Media

Parade Magazine is "Sew in Love"

Hot off the presses. Generation T: Beyond Fashion is in Parade Picks where they’re  “sew in love”! Parade proclaims that “do-it-yourself crafts are back in fashion” (wherever did they go?) and shares “some recent books [that] can teach you how to save money and be creative, too.” Now that’s the spirit! Here’s the in-print review (eft) as well as online (right):

Parade_GenT picture-22

*Ooh, and about the book cover featured with the online grab–it’s designer (and friend of the Generation T family) Cal Patch’s Design-It-Yourself Clothes, just out this month! I can’t wait to get my hands on a copy!

[ Comments Off on Parade Magazine is "Sew in Love" | Posted on September 21st, 2009 ]

Pillow Talk knotted pillow on AP Video

Brought to you by the Associated Press, here’s a video tutorial for project #30, Pillow Talk, a no-sew knotted pillow. Note: To stuff it, you can either use traditional stuffing (store-bought or from an old pillow) or scrap fabric from other projects. Enjoy!


[ 4 Comments | Posted on September 11th, 2009 ]

CraftSanity.com

I just got back from a quick trip to Michigan–and there’ll be plenty of photos from the workshop events to post soon! In the meantime, check out this segment on last week from Take Five & Company where Jennifer Ackerman-Haywood from CraftSanity shows off lots of projects from both Generation T books. She was busy!

Though the workshops have happened (sorry, no more signups), it’s so great to see all the awesome projects that Jennifer made!

[ Comments Off on CraftSanity.com | Posted on August 28th, 2009 ]

Take Five & Company

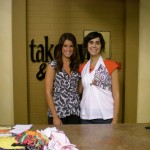
This morning on Take Five & Company in Grand Rapids, Michigan, host Tara Kuhnlein and I made a bib (Baby Back Bib, project #53) from Generation T: Beyond Fashion as well as that fabulous Pinup Halter (project #1) that you’ve all seen many times before!

dscn4185 dscn4182

Though we got a bit sidetracked from the baby shower theme, it was a fun segment–there are 2o different projects in the Kid Rock chapter–from the bib, to booties, to burp cloths and beyond. Inject a little craftiness into your next shower for some DIY fun!

[ Comments Off on Take Five & Company | Posted on August 27th, 2009 ]

Martha Stewart Radio

Greetings from the radio booth! You’d think it’d be difficult to have a decent conversation about something so visual (namely, crafting) over the radio, but we did it!

radio_title0508a

dscn4174

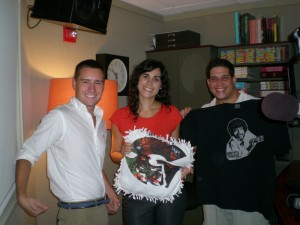
This morning on Martha Stewart Radio with host Terri Trespicio, a group of us talked and showed off projects from the book–two of the guys made an appliqued T-shirt, a knotted pillow, and a braided and looped headband/belt while a female producer made a draped halter top (they will be posting pictures over on their blog in the next week, so check back!). In the meantime, here are a few pics that I took. Check out that belt, the Wutang pillow (filled with T-shirt scraps!), and the Bob “happy little trees” Ross image pasted on the front of a new T-shirt.

dscn4170

We talked a lot about dudes who craft–and I’m glad we did! The fact is, guys like to make stuff, too–and they wear and collect T-shirts just as much as anyone. From my perspective, that DIY high (that “thanks, I made it myself” feeling) is not reserved for just one portion of the population–it’s equal opportunity crafting!

Let us know if you caught the segment–did it inspire you to go home and make something? I’m off to Grand Rapids, Michigan to make many somethings! I’m going to lead three T-shirt refashioning workshops tomorrow (a third one just added, from 2 to 4 pm!)–if you’re in the area, stop by!

[ 3 Comments | Posted on August 26th, 2009 ]

StyleSubstanceSoul.com

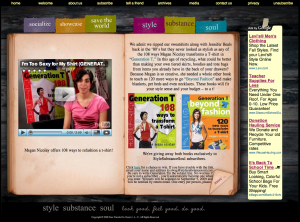
Check out the lovely review at Style Substance Soul along with a very vintage interview with moi — and a giveaway! Winners announced on September 5, so get moving!

picture-2

[ Comments Off on StyleSubstanceSoul.com | Posted on August 24th, 2009 ]

Grand Rapids Press

A reminder for any of you in the Grand Rapids area: Here are more details about this Thursday’s Tee Party events at West Side Garage Store from an article by Jennifer Ackerman-Haywood of Craft Sanity in the Grand Rapids Press. Hope to see you there! (P.S. And also, scroll down for details about a book giveaway via Jennifer’s site!)

Fashion old T-shirts into something ‘new’

Posted by Jennifer Ackerman-Haywood | The Grand Rapids Press August 23, 2009 06:36AM

Megan Nicolay, author of “Generation T: 108 Ways to Transform a T-shirt” and her new follow-up book, “Generation T: Beyond Fashion, 120 New Ways to Transform a T-shirt” is coming to Grand Rapids to teach people how to give their old T-shirts a second wind. (That’s Nicolay on the covers of both books.)

Megan Nicolay changed the way I looked at T-shirts with her first “Generation T” book. She piled on even more great ideas in her follow-up book, “Generation T: Beyond Fashion, 120 New Ways to Transform a T-shirt.”

It is in this second book, Nicolay offers step-by-step instructions for more ways to turn T-shirts into “new” tops, skirts and dresses, with bonus project ideas ranging from housewares (oven mitts, place mats and even a ruffled apron) to baby projects (bibs, booties, hats, toddler dresses and stuffed mobiles) and a padded laptop sleeve.

IF YOU GO:

T-shirt refashioning workshop
Who: Author Megan Nicolay
When: 10:30 a.m. to 12:30 p.m. and 6:30 to 8:30 p.m. Thursday
Where: West Side Garage Store, 351 Summer Ave. NW
Cost: $20 fee includes a copy of “Generation T: Beyond Fashion” book, a T-shirt and pair of scissors.
Sign-up: Call 451-4215, ext. 113.

The best part is many of the projects don’t require a sewing machine, just T-shirts and a pair of scissors.

This simplified approach to fashion makes the projects accessible to DIY enthusiasts of all skill levels.

“It really doesn’t need to be so scary,” said Nicolay, who will teach T-shirt refashioning workshops Thursday in Grand Rapids. “I really do want people to feel the DIY high.”

Originally from New Hampshire, Nicolay, 30, of Brooklyn, N.Y., got into T-shirt refashioning as a kid when she started turning old tees into fitted tank tops with her sisters. She continued in college when friends would ask her to “fix” their T-shirts. She decided to write a book on the topic and teach her techniques after landing a job at Workman Publishing, where she works as a book editor.

“Jersey knit is such a forgiving fabric — which is one of the reasons that the standard T-shirt has become such an iconic garment,” she said. “T-shirts are the most versatile pieces we own. We play sports in them, rock out in them, sleep in them, hang out in them. And as a material, a T-shirt is just as inviting because it won’t fray when you cut it.”

And T-shirt refashioning is a great way for beginners to experiment with quick, no-sew options, said Nicolay, who estimates she has taken scissors to more than 1,000 shirts.

Nicolay draws inspiration from a variety of sources, including people on the street.

“Sometimes, I see a garment or accessory that I like, and think, ‘Hmm, could I make that out of T-shirts?’ Then, I go home and experiment. Sometimes, it leaves me with the project I intended; sometimes, it leads me to a new project altogether.

“I was on a photo shoot recently and liked the necklace that one of the stylists was wearing — it was chainlike and made out of sterling silver, but I, nonetheless, tried to make a softie version a few weeks later.” (Look for that tutorial on her Web site soon.)

Nicolay will be teaching how to whip old T-shirts into stylish fashions at West Side Garage Store, 351 Summer Ave. NW, in Grand Rapids, a youth-run thrift shop founded in 2008 by Steepletown Neighborhood Services.

IF YOU GO:

Enter a random drawing to win a copy of Nicolay’s new book, “Generation T: Beyond Fashion.” Simply tell Jennifer about your favorite T-shirt craft. E-mail entries to jennifer@craftsanity.com.

“It’s going to be a tee party,” she said. “Folks who attend will learn a number of easy, no-sew techniques and how they can apply them to make a one-of-a-kind project to take home. It’s going to be fun — I can’t wait.”

I visited the West Side Garage Store for the first time about two weeks ago and was glad to find a selection of vintage sewing machines priced from $10 to $45 among the usual second-hand offerings. (Somehow, I managed to walk out without buying one, so you still have a chance.)

The thrift store is one of the city’s best-kept secrets, said Dick Bulkowski, director of Steepletown, Many have yet to discover it and all the refashioning possibilities contained inside. He’s hopeful Nicolay’s visit will help put the shop on the DIY map.

“The whole purpose is to market the store,” he said, adding it is not a typical second-hand store.

West Side Garage Store operates with a staff of five and teaches young people the skills necessary to run a business. Operational costs are offset by federal funding, and the store is stocked with donations from the community. Go check it out.

E-mail comments and story ideas to Jennifer Ackerman-Haywood at jennifer@craftsanity.com. Watch Jennifer on WZZM Channel 13’s “Take Five & Company” at 9 a.m. every Friday.

[ Comments Off on Grand Rapids Press | Posted on August 24th, 2009 ]

St. Louis Post-Dispatch

While I was out picnicking in the local park today (tofu pesto pasta, rice salad, and peach tomato compote, oh my! — to mention just some of the deliciousness), the St. Louis Post-Dispatch posted their latest crafty exploits from Generation T: Beyond Fashion. How fun! Here’s the article:

T-shirt Rehab

tote bag, redo, lifestyle, tank, colorful, st. louis post-dispatch (P-D)

POST-DISPATCH FASHION EDITOR

There are those who will tell you that the best way to recycle a T-shirt is to turn it into a dust rag, but we scoff at that.

When “Generation T: Beyond Fashion, 120 New Ways to Transform a T-shirt” by Megan Nicolay (Workman, $15.95, 310 pages) arrived, it was ripe with possibilities, and many were surprising and intriguing.

The book uses T-shirts like fabric, so nothing was really off-limits. There are dresses and yoga pants, car steering wheel covers and oven mitts, doggy beds and ski hats.

Most of the projects were simple enough for a novice, and many required no sewing.

Dozens of projects looked not just practical, but interesting. Nicolay shows people how to turn the graphic prints on even the most boring and mundane shirts into something eye-catching and appealing.

The boxy 10K T-shirt with the corporate logo and sponsor list on the back can now become an edgy halter top with a few snips and twists. Others can become reuseable shopping bags that you can ball up in your purse or even a decorative headband.

Everyone of our DIY crew marveled at one design or another and said, I’d wear/use/like that.

So now came the hard part, clearing the monumental hurdle of finding a cool do-it-yourself project and the task of actually doing said project. We gathered together one afternoon and finished most of the projects within hours. The greatest observation is that T-shirts are extremely forgiving, and they are also cheap.

It could make for an interesting afternoon for teens making wrist cuffs and fingerless gloves. Or imagine turning your leftover family reunion shirts into a trivet for your mom or a baby bib for your kid.

You could help an elementary school child make stuffed toys or a No. 1 finger using their too small little league shirt.

It’s nice to have options.

AMY BERTRAND, LIFESTYLE EDITOR

Starting point • One of the many Mizzou T-shirts hanging in my closet.
Project • A kid’s cape
Steps necessary to make • Two
Difficulty • Super-duper easy
Time • About 5 minutes
Tools necessary • Sharp scissors
Basic instructions • Step 1: Lay the shirt flat, with the portion you want on the cape facing up (in this case, Missouri basketball, which was on the front of the regular shirt). Step 2: Cut, starting at one far end of the bottom, up diagonally to the collar. Repeat on the other side and then cut around collar on the front (or in this case, back) of the shirt.
Observations • This was easier than I would have thought possible. But I have two little boys, so as soon as I brought this home, I had to make another cape.

DEBRA BASS, FASHION EDITOR
Starting point • An ugly generic tee from a corporate event that I wouldn’t even wear to bed.
Project • Tote bag (Photos on Page L1)
Steps necessary to make • About five (although the directions in the book call for 10)
Difficulty • Super easy
Time • About 10 minutes
Tools necessary • Needle, thread, scissors (sewing machine optional)
Basic instructions • I lay the shirt flat on a table and cut the sleeves and neck hole away to mimic the shape of a tote bag. Then I double stitched the bottom hem. I did cut a little of the torso away so that the bag looked more proportional.
Observations • I wish I had made it even shorter, because I would have liked it to be more proportional, but it works. I washed it before using it so the edges would tighten slightly.

Starting point • The scraps from the table.
Project • Necklace/scarf
Steps to make • Two, but the second step took about three days.
Difficulty • Super easy
Time • About 3 hours total
Tool necessary • Scissors
Basic instructions • Take a piece of shirt that’s about 16- to 36-inches long and about an inch in width. Next, tie knots at the ends. Cut lots and lots of strips that are about 3/4-inch wide and 6 inches long. Tie the strips to the longer strip with simple slip knots. They will act like beads that you can slide together.
Observation • The book uses this technique to make a scarf, but I decided to stop at necklace length because I liked the look. I thought it worked better using something with a design on the front because it adds character and looks a little more unexpected. I also wanted it to look fuller so I tied two strips together at a time so that it would add volume.

AISHA SULTAN, HOME AND FAMILY EDITOR
Starting point • A worn-out, misshapen soft tee with a pattern I loved and an oversized, generic red tee someone brought to add to the pile at work.
Project • Fitted tank top that combined the best of both shirts. (Photos on Page L1)
Steps necessary to make • About 10
Difficulty • Moderately challenging
Time • About 1 to 2 hours
Tools needed • Scissors, thread, needle, sewing machine, chalk marker, straight pins
Basic instructions • Lay one T-shirt flat, cut off the sleeves and cut out the neck band. Cut through the sides to the armholes. This will be the back of the new shirt. I cut two long strips from the backside (still connected to the neck hole), which would be used as the drawstrings in the new front. From the second shirt, I also cut out the sleeves and a straight horizontal line just below the neck band, from one armhole to the other. This single panel will be the front of the new shirt. I cut a vertical slit on top, folded 2 inches of fabric over and stitched it to create a 2-inch seam (the drawstrings will slide through this opening). Line the panels up, front to back, and sew the side together. Turn inside out, and thread the drawstrings through the front panel. Tie into a bow in front. You can adjust the strap width.
Observations • I should have started with two shirts that were the same size (like the instructions said) because the extra-large red shirt threw off the fitting around the shoulders and sleeves.


KAREN DEER, LIFESTYLE REPORTER
Starting point • A shapeless extra-large St. Louis T-shirt.
Project • A tunic
Steps to make • About six
Difficulty • Easy
Time • About 1 hour
Tools necessary • Seam ripper (optional), chalk marker (pencil or eyeliner pencil), scissors, needle, straight pins, sewing machine
Basic instructions • Turn the tee inside out. Cut off the sleeves and neck and remove the stitches from bottom hem (optional). With the shirt still inside out, put it on and pinch and mark the fabric on both sides all the way down to make it more fitted, starting at the armholes. If you have a friend to help you, have them pin the shirt while you’re wearing it, if not mark the fabric while looking in a mirror. Take the shirt off, lay flat and cut just outside the marked lines or pins. After you make cuts down one side of the shirt, fold the shirt in half vertically to trim the edges of the second side to match. Now, unfold the shirt and sew a running stitch along the edge. Remove the pins and you’re ready to add a belt and go.
Optional belt trick • Use any leftover T-shirt fabric in a coordinating color to make a belt. You can connect your scraps using the easy no-sew technique from the project done by reporter
Observations • The shirt made a nice swimsuit cover-up.

NANCY CAMBRIA, NEWS STAFF REPORTER
Starting point • An ailing tee that came from a
co-worker
Project • A non-sew rehab of the tee into an artsy,
form-fitting top.
Steps necessary to make it • Five
Difficulty • Super easy
Time • About 15 minutes
Tools necessary • Fabric scissors and a ruler (optional)
Basic instructions • I put the shirt flat on a table and then first cut off the sleeves just behind the arm socket seams. Then I cut off the bottom of the shirt just above the hem. Next I cut up the side seams on both sides of the shirt all the way to the underams so that the shirt hung together just by the neck and shoulder seams. Then I cut a series of 2-inch-long, 1-inch-wide strips up each side of the shirt, making sure to snip both the front and back panel with each cut. It tried to cut the same number of slits on each side of the shirt so it was symmetrical. Finally, strip by strip, I tied the front and matching back pieces together into simple knots up both sides of the shirt.
Observations • If you don’t like using a sewing machine, this is the project for you! Also, the design is very forgiving if you fail to make symmetrical or neat cuts up the side. Next time I would also cut out the neck line to give the shirt a softer look to match the free-form look of the side knots.

TIPPI THOLE, FEATURES DESIGN DIRECTOR
Starting point • A blue, election 2008 T-shirt my husband got at work that had stains on it.
Project • Baby booties (Photos on Page L1)
Steps necessary to make • Nine
Difficulty • Average
Time • 2 hours
Tools necessary • Scissors, measuring tape or ruler, pins, needle and thread.
Basic instructions • I cut eight rectangles out of the T-shirt, strategically choosing the areas I wanted for the tops and soles of the booties. I then rounded the corners and cut a line through the pieces that would become the tops of the booties (so the baby’s feet could go in). I then handstitched the tops (two layers) and bottoms (two layers) together and finished the foot opening with a whipstitch.
Observations • In retrospect, I would do the project again with a sewing machine rather than sewing it by hand; it would have taken half the time plus I think the booties would be more durable for an active baby and frequent washing.

[ Comments Off on St. Louis Post-Dispatch | Posted on August 15th, 2009 ]

WCBS in New York, NY

It was a late night followed by an early morning here in New York City! Up at 4:30 a.m. to make it to the CBS studios by 6:00! The morning show was in the 6 to 7 hour on WCBS-TV, presided over by the smart and fabulous Cindy Hsu, Mary Calvi, and Megan Glaros. Cindy and I made the Pinup Girl halter (surprise!) and had great fun. Here’s the link to the segment, until I can figure out how to embed it!

[ Comments Off on WCBS in New York, NY | Posted on August 15th, 2009 ]

Chicago Parent Magazine

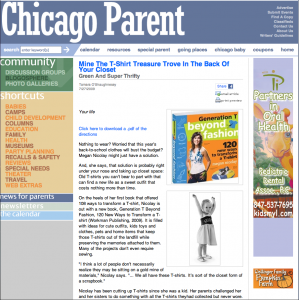
I wish I had a print version to share, but luckily Chicago Parent put it up on their website, too! Click through and you’ll also have access to  instructions for the toddler dress featured in the article.

picture-1

[ Comments Off on Chicago Parent Magazine | Posted on July 28th, 2009 ]