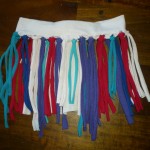
Besides all the cooking and baking and cheese-plate making that happened over Thanksgiving (playing host to 14 adults, 1 preschooler, and 1 newly adopted kitten), there was also the task of entertaining the little one (our adorable niece) as she scrambled around underfoot. So Mr. T and I put together a big pink bag-o-fun tote that she could dig into whenever she got bored. Of course Generation T made it into the bag: the Shake It Up Baby skirt (no-sew project #59 in book 2), made from a bunch of sleeves and other scraps in my workshop. I’m glad a took a picture of it before our niece tried it on, because as you can see, she didn’t stop moving once she had it on (between dancing to the music we had on and charging at me from down the hallway–that’s a lot of blur to try to catch on camera!).
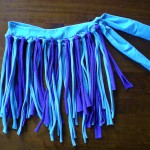
And because I was on a roll, I went ahead and made a skirt for another young friend of mine and mailed it out in a care package I had been sitting on for months. The skirt was lightly longer (she’s a little older), and with purple and blue color strips this time! This is such a great project because it a) gives a use for all those scraps b) is no-sew c) is super easy–seriously, it will only take you about 15 to 20 minutes d) is ridiculous fun for the wearer!
And, as a variation, if your tiny dancer likes bling, you can always glue on some “gems,” buttons, felt shapes, or feathers at the bottom of each fringe strip.
Let’s not forget our four-legged guest–the kitten was also in need of entertainment, once she got over the massive crowd invading her space. We tied extra T-shirt strips to the arms of a wooden chair and let them dangle there with a knot at the end so she’d have something to grab hold of. Whenever she was feeling playful, she wandered by and attacked! The T-shirt strips are perfect because they’re springy; when she releases them from her grip, they snap back and bounce around like they have a mind of their own. I’ve now added a Mouse Padded (stuffed cat toy, project #67) to my “to make” list…
[ Posted on November 30th, 2009 ]


[…] girl in the photo looks familiar, it’s because you may have seen her around in the recent Thanksgiving post! She’s my niece, and she’s wearing The Little Empress dress (project #58 in Generation […]
Pony beads fit beautifully over the ends of the fringes and offer a bit of weight to help them flow and flip! Just thread the bead on with your fingers (the hole is usually big enough) or use a crochet hook. Tie a knot on the end of the fringe to secure the bead. (Not recommended for kids under 3, of course!)Love this pattern!
These are fab! I just posted a link to your tutorial from my blog, in a post about t-shirt reconstruction and upcycling: http://www.re-creations-project.org I love the pony bead idea in the comments above too!
Thanks, Stacy, for the link! Glad you like it!
[…] Fuente e imágenes: generation […]
Is there a tutorial on how to make these?